Installing and Configuring a VPN with VLESS and Reality — актуализация 2026
Installing and Configuring a VPN with VLESS and Reality
Архивное переиздание с актуализацией. Оригинал опубликован на Habr (2026), автор — неизвестен. оригинал доступен на Habr по состоянию на ноябрь 2026. Ниже — редакция ноября 2026: что работает сейчас, что изменилось и как правильно повторить рецепт сегодня. Полный текст оригинала — в конце, без купюр.
TL;DR — версия 2026
VLESS+REALITY (Xray) в 2026 — главный рекомендованный способ: маскировка под TLS к чужому крупному сайту, активное зондирование не проходит, домен и сертификат не нужны.
Оригинал попал в первую волну статей о VLESS+Reality — и с тех пор подход не просто выжил, а стал стандартом: фактическим стандартом антицензурного туннелирования в 2026 стал VLESS + REALITY (Xray-core): он маскируется под обычный HTTPS-трафик к крупному сайту и не требует собственного домена и сертификата; по данным РКН, за 2025 год в России заблокировано 258 VPN-сервисов, и почти все выжившие сервисы сидят именно на Xray. Что изменилось с публикации: пару-тройку версий Xray-ядра, новые клиенты, панели 3x-ui/Marzban с автонастройкой Reality, и — увы — статья о том, как это ставить, стала легальной мишенью (российские сайты и сами хабр-авторы начали массово удалять статьи о VPN (статьи отдают HTTP 451 «удалена по юридическим причинам») — именно поэтому появляются проекты-архивы вроде этого).
Статус оригинала
- URL: https://habr.com/ru/articles/990128/
- Статус на Habr: ЖИВА
- Картинки: 3/3 сохранено локально
Клиенты и панели 2026
- клиенты: v2rayN (Windows), NekoBox/NekoRay, Hiddify (кросс), v2rayNG (Android), Streisand/Shadowrocket (iOS — ставить быстро, Apple вычищает их из стора волнами);
- панели: 3x-ui (мульти-протокол, лимиты трафика, подписки) и Marzban — обе ставятся docker-compose и закрывают тему «у меня 5 друзей»;
- подписка: ссылка
vless://...превращается в QR/URL, Hiddify сам обновляет; - проверка блокировок вокруг вашего сервера:
blockcheckот ValdikSS.
Почему REALITY до сих пор непробиваем
REALITY «крадёт» рукопожатие у настоящего TLS-сайта: ваш сервер, не имея сертификата, отдаёт клиенту handshake реального target-сайта (dest), а внутри договаривается о ключах. Со стороны (DPI, активный probe) это обычный HTTPS к популярному ресурсу. Ответить probe-ом «не тем» сервер не может — нечем отличить. В 2025–2026 у операторов блокировок остаётся один приём: резать «подозрительные» IP целиком. Лечится CDN-фронтом или сменой IP.
Минимальный сервер 2026
Актуальный Xray-core (ветка 2x/25.x) — ставится официальным скриптом; ключевые поля:
"inbounds": [{
  "listen": "0.0.0.0",
  "port": 443,
  "protocol": "vless",
  "settings": {
    "clients": [{ "id": "<uuid>", "flow": "xtls-rprx-vision" }],
    "decryption": "none"
  },
  "streamSettings": {
    "security": "reality",
    "realitySettings": {
      "dest": "www.microsoft.com:443",
      "serverNames": ["www.microsoft.com"],
      "shortId": "",
      "privateKey": "<x25519>"
    }
  }
}]
Выбор dest: крупный зарубежный сайт с TLS 1.3 + H2, НЕ ваш CDN, не российский, не «за Cloudflare» (цикл). Проверка: openssl s_client -connect dest:443 с сервера должна отдавать нужный SNI.
Иллюстрации из оригинала

Что изменилось с 2026 года
- uTLS-фingerprint клиента теперь критичен (chrome/firefox из коробки)
- flow xtls-rprx-vision — норма; старые flow без vision уязвимы к детекту
- XHTTP-транспорт добавился как альтернатива ws/gRPC за CDN
- 3x-ui заменил большинство «костыльных» bash-панелей из статей 2023 года
- iOS-клиенты требуют зарубежный Apple ID чаще, чем в 2024
Чек-лист 2026
- dest — живой крупный сайт с TLS1.3, доступный С ВАШЕГО сервера
- shortId непустой
- uTLS fingerprint клиента совпадает с типичным браузером
- сервер не «светится» сканерами (закрыть 80/8080-заглушки)
- fallback на реальный сайт, если probe придёт без правильного SNI
Вердикт
Оригинальная статья была верной — просто Xray с тех пор обновился, панели стали удобнее, а сама тема — юридически горячей. Конфиг выше — минимальная «сегодня-работает»-версия; вся методология оригинала (x25519-ключи, SNI-подбор, проверка blockcheck) неизменна.
ОРИГИНАЛ СТАТЬИ (без изменений)
In this article, we will look at 3 ways to set up a VPN connection with VLESS and Reality.
VLESS is a modern data transfer protocol designed to provide high speed and privacy on the internet. It is often called VLESS VPN, although strictly speaking, we will be discussing the installation of a proxy with the VLESS protocol based on an XRay server with Reality.
Let’s start with the simplest and most universal option, which requires no technical knowledge.
Method 1. Simple Installation
The fastest and most convenient way to set up VLESS is with Amnezia, detailed instructions are here.
Go to VDSina and register. If the site doesn’t load, try this virtual browser, and complete the registration within the 3 free minutes; you only need an email. A password and a link to your personal account will be sent to it, which should load without any problems. Log in to your account and order a standard server with 1 core and 2GB of RAM. Then, install the AmneziaVPN application on your computer or phone, launch it, click on “Self-hosted VPN” (set up a VPN on your own server) and enter the IP address and root password of our virtual server. In the next step, click on “Select VPN protocol” and select “XRay” (XRay with Reality).
The program will then configure everything on the server and prompt you to connect to your VPN. The VLESS protocol is used by default.
Method 2. Virtual Server with 3X-UI
With the hosting provider mentioned above, when ordering a server, you can choose to install 3X-UI (or X-UI) — a convenient graphical interface for configuring XRay with VLESS.
When the server is ready, you will receive a link to log in to the VPN settings panel, as well as a username and password.
Open this link, log in, and go to the “Connections” section. Next, click “Add Connection” and perform the following actions in the pop-up window:
Protocol set to vless, port change to 443
In the “Security” line, select Reality and press the “Get New Cert” button
In the “Client” section, replace Email with any recognizable name, and for Flow select xtls-rprx-vision
Don’t change anything else, click “Create” and make sure that the new configuration has been added and is available as a QR code or URL link (the ‘Information’ icon), which will be used later to connect to the VPN.
For clarity, I’ll show this in a video:
Creating a new VLESS connection in 3X-UI
The server is configured, and to connect to it, you need to install a client program. Here are the most popular clients:
for Windows: Hiddify, InvisibleMan-XRay, NekoBox
for iOS and MacOS: Hiddify, FoXray, Streisand
for Android: Hiddify, v2rayNG, NekoBox
To connect most clients, you just need to scan the configuration QR code or paste the corresponding URL link. In some cases, if the client does not have an import function, the configuration data from the URL link must be transferred manually.
Method 3. Manual Installation
This option is the most labor-intensive and involves several steps. As with the previous two methods, it is assumed that you already have a VPS.
Step 1. Log in to the server as root, update the package lists, and run the XRay installation script:
apt update -y
bash -c "$(curl -L https://github.com/XTLS/Xray-install/raw/main/install-release.sh)" @ install
Step 2. Create the necessary credentials for the configuration and save them somewhere; you will need them later:
xray uuid
xray x25519
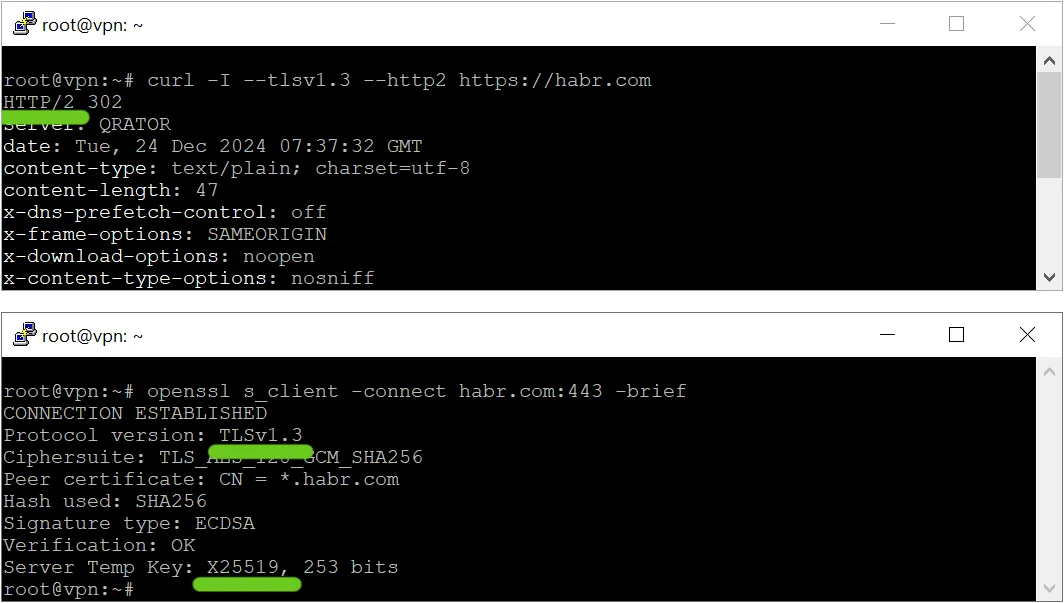
Step 3. For VLESS to work, you need a site that supports HTTP/2, TLS 1.3, and an X25519 certificate. You can check this as follows:
curl -I --tlsv1.3 --http2 https://example.com
openssl s_client -connect example.com:443 -brief
Example of checking Habr:
How to check for HTTP/2, TLS 1.3, and X25519 support
Step 4. Replace the contents of the /usr/local/etc/xray/config.json file with the config template below. The template needs to be edited and supplemented according to the comments in it:
config.json
{
    "log": {
        "loglevel": "warning"
    },
    "inbounds": [
        {
            "port": 443,
            "protocol": "vless",
            "settings": {
                "clients": [
                    {
                        "id": "",          // здесь вставить uuid, сгенерированный на шаге №2
                        "flow": "xtls-rprx-vision"
                    }
                ],
                "decryption": "none"
            },
            "streamSettings": {
                "network": "tcp",
                "security": "reality",
                "realitySettings": {
                    "dest": "example.com:443",	// здесь заменить `example.com` на ваш сайт из шага №3, порт оставляем
                    "serverNames": [
                        "example.com",		// заменить на ваш сайт из шага №3
                        "www.example.com"   // и добавить альтернативные имена (если есть)
                    ],
                    "privateKey": "",		// вставить приватный ключ (Private key), созданный на шаге №2
                    "shortIds": [
                        "0a381e1fa219",		// Список уникальных коротких идентификаторов, доступных клиентам, чтобы их различать
                        "be0ce04754dc",		// Длина: от 2 до 16 символов. Используемые символы: 0-f.
                        "41beec74f4bc" 		// Для удобства, значения можно сгенерировать командой `openssl rand -hex 6`
                    ]
                }
            },
            "sniffing": {
                "enabled": true,
                "destOverride": [
                    "http",
                    "tls"
                ]
            }
        }
    ],
    "outbounds": [
        {
            "protocol": "freedom",
            "tag": "direct"
        }
    ]
}
Step 5. Restart XRay and make sure everything is working:
systemctl restart xray
systemctl status xray
The server is ready. We discussed the list of client applications for connection in the previous setup method; use them.
Prepare the configuration URL string to paste into the client, here is the template:
vless://<uuid из шага 2>@<IP-адрес сервера>:443?type=tcp&security=reality&pbk=<публичный ключ из шага 2>&fp=chrome&sni=<домен из serverNames в конфиге>&sid=<одно из значений shortIds в конфиге>&flow=xtls-rprx-vision#<произвольное название, под которым профиль будет сохранён в приложении>From this string, you can use any QR generator to create a graphical code for easy configuration import later. For example, like this:
apt install qrencode -y
qrencode -o qr.png 'vless://...'
As a result, we will get a file qr.png containing a QR code that can be scanned by any compatible client.